
Quick Answer
Inspecting hydraulic cylinder parts involves a systematic external and internal review: check the rod for scratches, pitting, and straightness; examine the barrel bore for scoring and ovality; assess seals for hardening, cuts, or extrusion; measure wear rings for minimum thickness; and verify mount integrity. A structured inspection routine—daily visual checks, weekly rod scans, and detailed measurements during rebuilds—can extend cylinder life significantly and prevent unexpected downtime.
Key Takeaways
-
A rod surface scratch you can feel with a fingernail means the chrome is damaged and will rapidly destroy seals.
-
Always measure barrel bore at multiple positions and axes; ovality over 0.05 mm indicates a need for honing.
-
Worn wear rings are the silent killers of pistons and glands—inspect and replace them proactively.
-
Never install new seals on a damaged rod or scored barrel; the new seals will fail within hours.
-
Keep an inspection log: data trends reveal wear patterns and help plan maintenance before failure.
Who Should Read This Guide?
✔ Hydraulic repair technicians performing cylinder overhauls
✔ Fleet maintenance managers scheduling preventive inspections
✔ Equipment operators conducting daily walkarounds
✔ Quality control inspectors in manufacturing or rebuild shops
✔ Anyone looking to extend hydraulic cylinder service life
Why Routine Inspection Matters
Hydraulic cylinders work in harsh, dirty, high-pressure environments. Contamination, side loads, and cyclic fatigue gradually degrade components. Most catastrophic cylinder failures—bent rods, scored barrels, burst seals—start as small, detectable issues that a quick inspection could have caught.
A consistent inspection routine delivers:
-
Fewer unplanned breakdowns – You replace a $5 wiper seal instead of a $500 rod.
-
Longer component life – Clean, well-maintained cylinders routinely exceed 15,000 operating hours.
-
Safer operations – Load-holding and structural integrity are verified.
-
Lower lifetime cost – Planned part replacement costs significantly less than emergency repairs and downtime.
This guide breaks inspection down by component and frequency. Use it alongside our Troubleshooting Hydraulic Cylinder Drift guide and Seals Guide for a complete maintenance toolkit.
Inspection Frequency Overview
| Frequency | Inspection Items |
|---|---|
| Daily / Each Shift | External leaks, rod condition, mount tightness, unusual noises |
| Weekly | Rod surface scan, wiper seal integrity, pin and bushing play |
| Monthly | Mount bolt torque, port tightness, corrosion check |
| Every 2,000–4,000 Hours or During Rebuild | Barrel bore measurement, rod straightness, piston and gland groove dimensions, wear ring thickness, seal condition |
| After Any Repair | Full pressure test, drift test, cycle test |
Use this schedule as a baseline, adjusting frequency for your operating environment. Mining, marine, and heavy-construction applications may require accelerated intervals.
Pre-Inspection Safety
Hydraulic systems store energy even when the pump is off. Before any hands-on inspection:
-
Lower all loads to the ground or engage mechanical safety locks. Never rely on hydraulics to support a raised implement.
-
Stop the engine and relieve system pressure per the manufacturer’s procedure.
-
Allow the cylinder to cool – hot oil and surfaces can cause burns.
-
Wear appropriate PPE: Safety glasses, gloves, and steel-toed boots at minimum. For internal inspection, add chemical-resistant gloves for oil contact.
External Inspection (Daily / Each Shift)
A thorough external inspection takes less than two minutes per cylinder and catches the vast majority of developing problems.
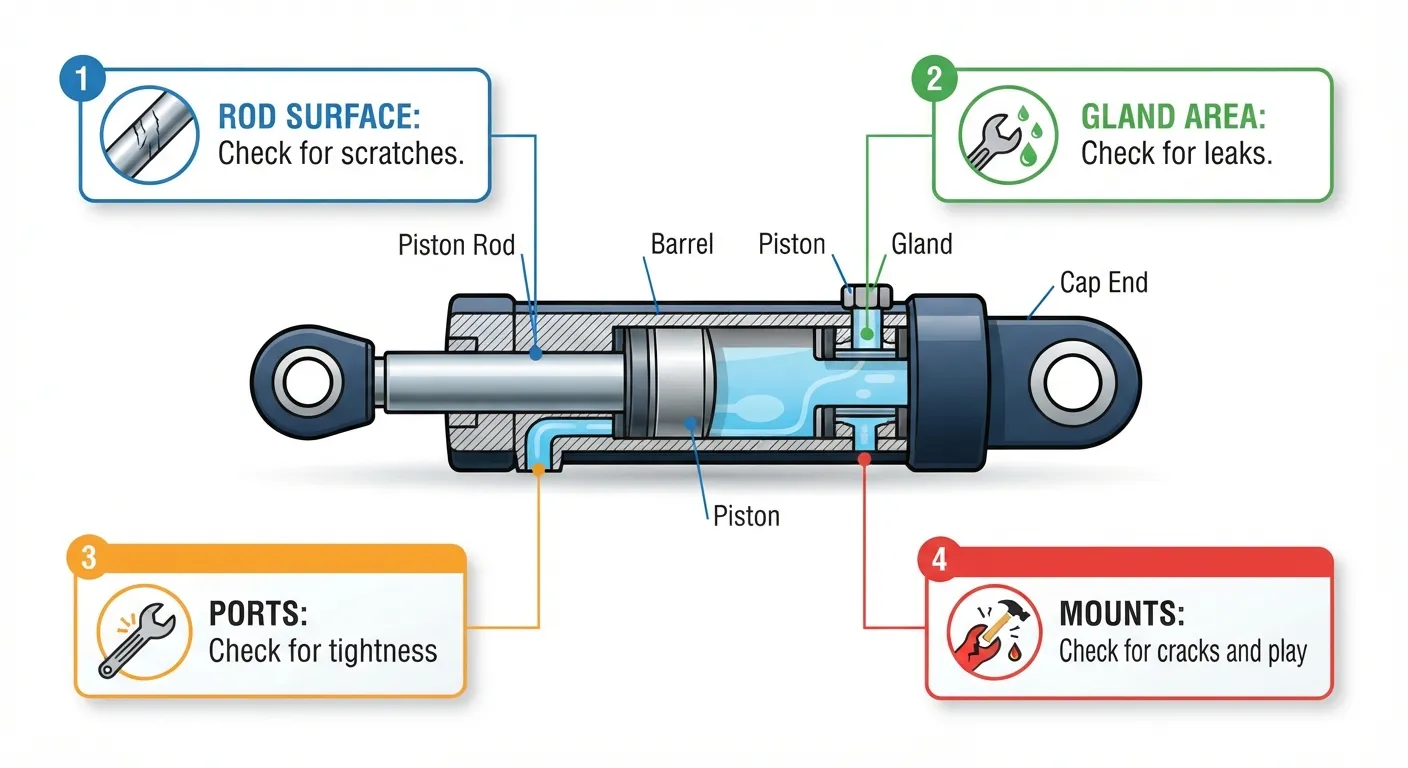
1. Check for External Leaks
Walk around the machine and look at every cylinder.
-
Rod seal area: Any oil film, dampness, or wet dust ring on the rod is a leak. A light lubrication film is normal; streaming or dripping is not.
-
Gland-to-barrel joint: Look for oil seepage around the threads or flange.
-
Ports and fittings: Tight and dry? Any signs of cracking around the port boss?
-
End cap / weld area: Check for hairline cracks or oil staining.
Action: A leaking rod seal demands immediate replacement. A damp gland joint may only need retorquing, but plan for a gland O-ring replacement soon.
2. Scan the Piston Rod
Extend the rod fully, if possible, and visually inspect the entire length.
-
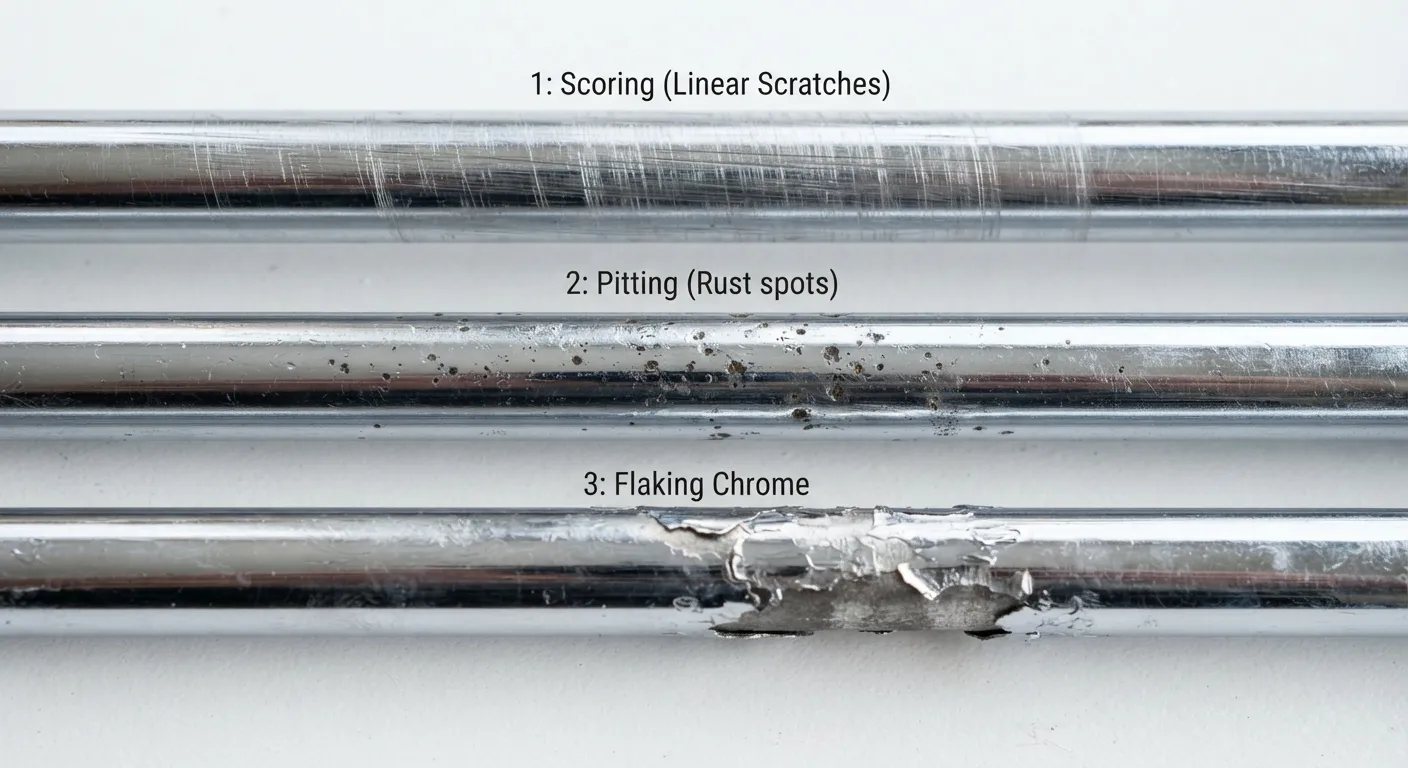
Scratches: Run your (gloved) fingernail lightly across any mark. If you can feel it, the chrome is damaged and will grind the rod seal.
-
Chrome peeling: Flaking chrome creates a razor-sharp edge that cuts seals instantly.
-
Pitting: Small rust spots indicate chrome porosity or mechanical damage. In wet environments, this will spread.
-
Discoloration: Overheating can leave blue or straw-colored bands, indicating the rod has lost its temper.
Action: Any scratch you can feel requires rod re-chroming or replacement. Shallow marks that are only visual can be polished if caught early.
3. Check Mounts and Pins
Grab the cylinder and try to move it by hand (with the machine locked out).
-
Pin and bushing play: Any knocking or lateral movement indicates worn pins, bushings, or elongated bores.
-
Weld condition: Look for cracks around mounting brackets, especially at the end cap and rod eye.
-
Bolt tightness: Missing or loose mount bolts are a red flag.
Action: Worn mounts cause misalignment, which side-loads the rod and accelerates gland bushing and seal wear. Replace worn pins and bushings, and retorque loose bolts to specification.
4. Listen During Operation
After the visual inspection, operate the cylinder through a full cycle.
-
Knocking at stroke end – Cushion wear.
-
Squealing or chattering – Air in the system, or dry/damaged seals.
-
Grinding noises – Metal-to-metal contact, usually from worn wear rings.
Weekly Inspection
Add these slightly more detailed checks once a week.
1. Rod Surface Scan
With the cylinder extended, use a bright flashlight held at a shallow angle. The light will cast shadows into scratches and pits you might miss in direct light. Pay extra attention to the area that passes through the wiper seal—this is where contamination first attacks.
2. Wiper Seal Condition
Look at the wiper seal lip where it contacts the rod. It should be pliable and making full contact.
-
Hardened, cracked, or gapped lip – Replace immediately. A compromised wiper lets dirt directly into the rod seal.
-
Embedded debris – If the lip has metal or dirt particles stuck in it, carefully remove them and assess the rod surface underneath.
3. Pin and Bushing Clearance
If possible, use feeler gauges or a dial indicator to measure radial clearance at the pivot pins. Compare to the manufacturer’s specification. General rule: clearance should not exceed 0.5 mm on most mid-size cylinders.
Detailed Component Inspection (During Rebuild or at 2,000–4,000 Hour Intervals)
When a cylinder is opened for a seal change, take the opportunity to measure and document everything.
Tools You’ll Need
-
Dial bore gauge (for barrel ID)
-
Outside micrometer (for rod OD, piston OD)
-
Calipers (for groove widths and depths)
-
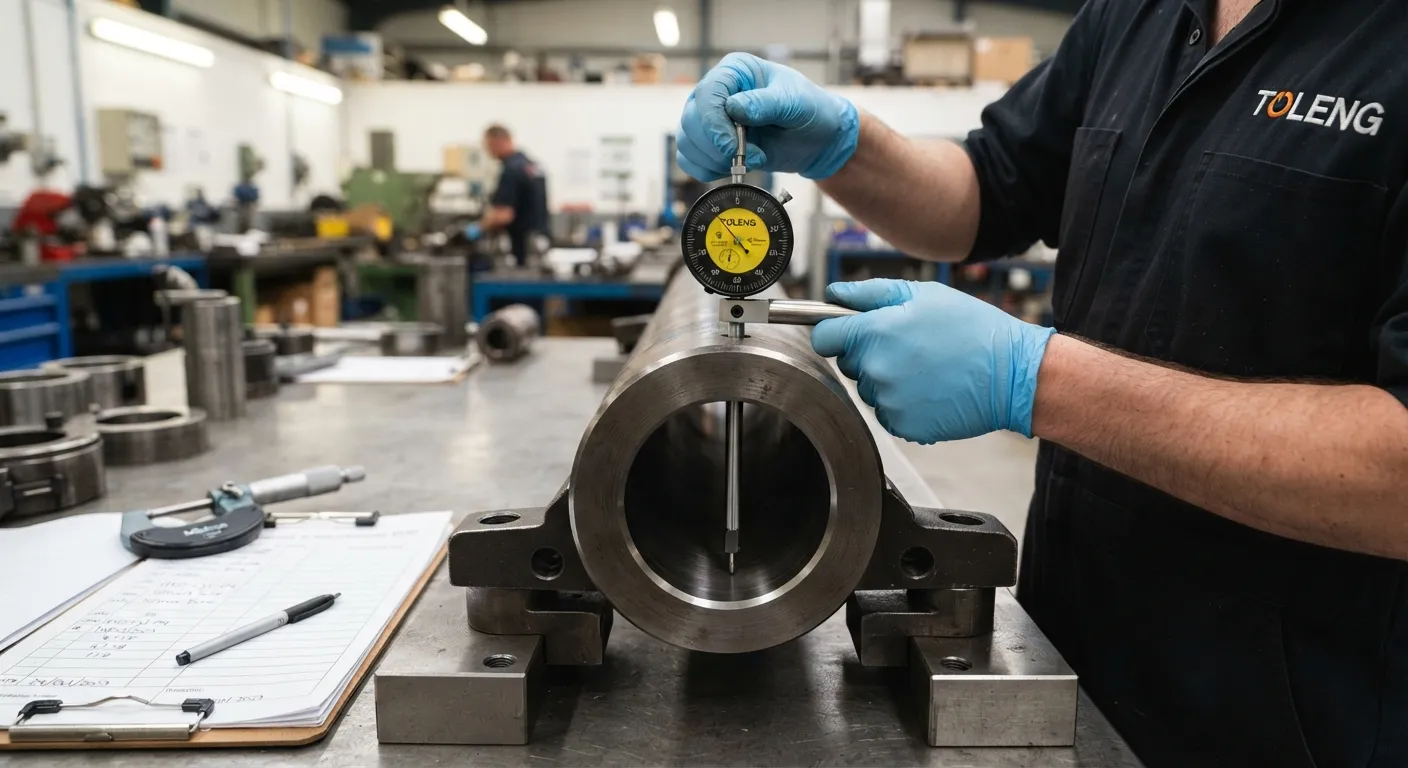
Dial indicator with magnetic base (for rod straightness)
-
Coating thickness gauge (for chrome thickness)
-
Feeler gauges
-
Bright inspection light
-
Clean, lint-free cloths
1. Barrel Bore Inspection
The barrel bore is the running surface for the piston seal. Any damage here causes internal bypass, drift, and heat.
-
Clean the bore thoroughly with a lint-free cloth. Remove all oil residue to see the metal surface clearly.
-
Visual inspection: Use a bore scope or inspection light. Look for linear scoring, pitting, or a wear step where the piston stops at the end of stroke.
-
Dimensional check: Measure the bore with a dial bore gauge at three depths: near the gland end, in the middle, and near the end cap. At each depth, measure in two perpendicular axes (e.g., vertical and horizontal).
-
Acceptable: Less than 0.05 mm ovality, no scoring deeper than 0.2 mm.
-
Requires honing: Scoring up to 0.2–0.3 mm deep can be honed to the next oversize.
-
Replace barrel: Bulging, deep scoring over 0.3 mm, or cracks.
-
Document: Record all measurements and the date. This creates a wear history for the cylinder.
2. Piston Rod Inspection
The rod is the most expensive single component. Inspect it meticulously.
-
Straightness: Place the rod on V-blocks or rollers and use a dial indicator along its length. Total Indicator Reading (TIR) should not exceed 0.1 mm per meter of rod length. For shorter rods, 0.05 mm TIR is a tighter target.
-
Chrome thickness: Use an eddy-current coating gauge at multiple points. Thin spots (<15 microns) or high variability indicate poor plating quality or uneven wear.
-
Surface condition: Re-inspect for scratches, pits, and corrosion as described in the daily check. After cleaning, the rod should have a uniform mirror finish. Any dull or rough patches are suspect.
Action:
-
Shallow scratches and thin chrome: Re-chrome and grind.
-
Bent rod: Replace. Straightening a hardened rod risks fatigue failure.
-
Deep pits or deep scratches: Replace if re-chroming cannot restore the surface within tolerance.
3. Piston Inspection
-
OD check: Measure the piston outer diameter with a micrometer. Look for scoring or galling. A scored piston OD will bypass fluid even with a new seal.
-
Seal groove inspection: Measure groove width and depth with calipers. Side clearance between the seal ring and groove should be within the seal manufacturer’s specification (typically 0.1–0.3 mm). Worn, widened grooves allow the seal to extrude and fail.
-
Thread condition: Check the rod connection threads. Any visible deformation or cracking means the piston must be replaced.
Action:
-
Good OD, good grooves: Reuse with new seals and wear rings.
-
Worn grooves: Replace piston.
4. Gland Inspection
-
Bushing clearance: Insert the cleaned rod into the gland bushing. Measure the radial play with a dial indicator. Excessive clearance (typically over 0.5 mm for mid-size cylinders) allows rod deflection and seal wear.
-
Seal cavities: Check for corrosion, pitting, or damage in the rod seal and wiper seal bores. Even small pits can cause static leakage.
-
Threads: Inspect the gland threads (both external and internal) for galling or cracking.
Action:
-
Replace the bushing if clearance is excessive. Some glands allow bushing replacement; others require a complete gland.
-
Replace the gland if threads or seal cavities are damaged.
5. Seal & Wear Ring Condition
Even though you’ll be replacing the seal kit, examining the old seals tells you what went wrong and whether other components need attention.
| Old Seal Condition | What It Tells You |
|---|---|
| Flattened, worn lip | Normal end-of-life wear; no other action needed |
| Cut or nicked lip | Damaged rod surface or debris in the system |
| Extruded, nibbled edge | Excessive pressure or oversized seal groove |
| Hardened, cracked | Overheating or incompatible hydraulic fluid |
| Swollen, soft | Fluid contamination or chemical incompatibility |
| Embedded debris | Failed wiper seal; flush the entire system |
Wear rings: Measure the thickness of the old wear ring and compare it to the new one. If the old ring is worn to less than half its original thickness, check the piston OD and gland bore for scoring.
6. End Cap & Welds
-
Dye penetrant inspection: If you suspect cracks on the end cap weld, a simple dye penetrant kit can reveal them. Any crack in a pressure-retaining weld means the cylinder must be replaced or repaired by a certified welder with proper post-weld stress relief.
-
Mount eye: Measure the pin bore diameter. Elongation indicates the mount needs re-bushing or replacement.
Post-Repair Testing
After reassembly with new seals (and any reconditioned hard parts), verify the cylinder’s integrity before returning it to service.
1. Low-Pressure Test
Cycle the cylinder slowly at low pressure (10–20% of working pressure) to purge air and check for binding or uneven movement.
2. Full Pressure Test
Pressurize to 1.5× the rated working pressure and hold. Check for:
-
External leaks at the gland, end cap, and ports.
-
Drift: With the cylinder under load, block the ports and observe the rod for any movement over 5–10 minutes.
3. Functional Cycle Test
Run the cylinder through several full-speed cycles to ensure smooth operation and proper cushioning (no end-stroke hammering).
Document all test results. Attach the test record to the cylinder’s maintenance log.
Inspection Quick-Reference Table
| Component | What to Check | Tool | Acceptable Limit | Action if Exceeded |
|---|---|---|---|---|
| Rod surface | Scratches, pits, chrome peel | Visual, fingernail | No fingernail-catching marks | Polish or re-chrome |
| Rod straightness | TIR along full length | Dial indicator | <0.1 mm/meter | Replace rod |
| Chrome thickness | Uniformity, min thickness | Coating gauge | >15 µm, uniform | Re-chrome |
| Barrel bore | Scoring, ovality, wear step | Bore gauge, borescope | <0.05 mm ovality, <0.2 mm scoring | Hone to oversize or replace |
| Piston OD | Scoring, galling | Micrometer | Smooth surface | Replace if scored |
| Piston grooves | Width, side clearance | Calipers | Per seal mfr spec (typically <0.2 mm clearance) | Replace piston if worn |
| Gland bushing | Radial clearance | Dial indicator | <0.5 mm | Replace bushing or gland |
| Wear rings | Remaining thickness | Calipers | >50% of new thickness | Replace |
| Seals | Cuts, hardening, extrusion | Visual | Intact, pliable | Replace complete kit |
| Mounts | Pin bore elongation, weld cracks | Calipers, dye penetrant | Per OEM spec | Re-bush or replace |
Real-World Example: Inspection Catches Rod Scoring Early
A paper mill was experiencing recurrent rod seal failures on a hydraulic cylinder operating in a wet, dusty environment. During a routine weekly rod scan, a maintenance technician noticed three fine, parallel scratches beginning to form on the rod surface—early contamination damage just past the wiper seal.
Because the damage was caught before it became severe, the rod was polished in place and a new heavy-duty wiper seal was fitted. The rod seal was proactively replaced. The cylinder went on to operate without further issues for over 8,000 hours. Catching those scratches early—before they became grooves—saved the mill the cost of a complete rod replacement and days of downtime.
(Case details based on Toleng application support; identity withheld for confidentiality.)
Frequently Asked Questions
Q: How often should I inspect my hydraulic cylinders?
A: Daily external checks, weekly rod scans, and detailed internal inspection every 2,000–4,000 operating hours or during any seal replacement.
Q: Can I inspect a cylinder without removing it from the machine?
A: Yes, daily and weekly external inspections are performed in-situ. Internal barrel, piston, and seal inspection require disassembly.
Q: What is the most common thing missed during a cylinder inspection?
A: Barrel bore ovality. Many rebuilders replace only the seals without measuring the bore. A slightly oval barrel will cause rapid seal wear and drift.
Q: How do I know if a rod scratch is too deep to polish?
A: If you can feel it with a fingernail, it is too deep to leave untreated. Whether it can be polished out or needs re-chroming depends on its depth relative to the chrome thickness. Measure it.
Q: Can I reuse wear rings if they look okay?
A: It is not recommended. Wear rings are inexpensive compared to the pistons and glands they protect. Always replace them with a seal kit.
Q: Do I need special tools to inspect a cylinder properly?
A: A dial bore gauge, micrometer, and dial indicator are the minimum for accurate measurement. These are standard tools in any hydraulic repair shop.
Q: Does Toleng provide inspection services or training?
A: We provide remote technical support to guide your team through the inspection process. Contact us for assistance or to source the measurement tools you need.
Start Your Preventive Inspection Program Today
Download our free, printable Hydraulic Cylinder Inspection Checklist. It includes all the daily, weekly, and overhaul checkpoints in a fillable format, plus a measurement log to track wear over time.
Need replacement parts identified during an inspection? Our team can supply OEM-quality rods, seal kits, glands, pistons, and complete cylinders built to your specifications.

